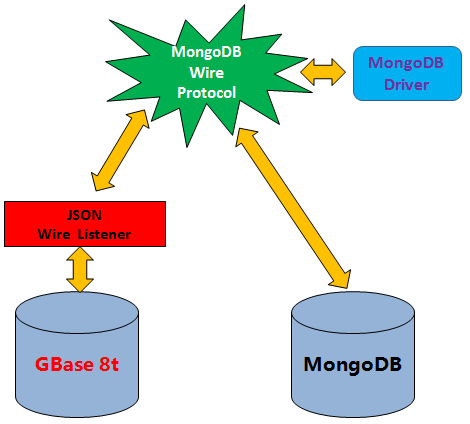
GBase 8t和NoSQL结合
GBase 8t的NoSQL功能是通过JSON 有线侦听器(JSON Wire Listener)来实现的。NoSQL的请求和保持通过有线侦听器使用JDBC连接到GBase 8t数据库。以下示例中我们使用Mongo Shell作为NoSQL连接到GBase 8t数据库的客户端工具。
有线侦听器使 GBase 8t/Informix 用户能够利用 MongoDB 社区驱动程序在 GBase 8t/Informix中原生地存储和查询 JSON 数据,进而将 GBase 8t/Informix用作 JSON 文档存储。
有线侦听器是一个服务器应用程序,它接受和处理 MongoDB 有线协议。它利用一个 GBase 8t/Informix JSON API 来处理、存储并从GBase 8t/Informix中检索 BSON 文档。下图显示了使用 MongoDB API 和 GBase 8t/Informix开发的应用程序之间的通信。

使用的环境如下:
操作系统:RHEL 6U8 64bit
数据库版本:GBase 8t Database Server Version 12.10.FC4G1AEE_1.6.3.54
Mongo Shell:Mongo 2.4.9
配置步骤:
1,用户环境变量
增加CLASSPATH, IBM_JAVA_OPTIONS两个用户环境变量
CLASSPATH=$INFORMIXDIR/lib/ifxjdbc.jar
IBM_JAVA_OPTIONS=-Dcom.ibm.tools.attach.enable=no

export CLASSPATH IBM_JAVA_OPTIONS
2,配置文件jsonListener.properties
jsonListener.properties在$INFORMIXDIR/etc目录下,可由jsonListener-example.properties为模板创建,内容如下:
listener.type=mongo
listener.port=12000
security.sql.passthrough=true
url=jdbc:informix-sqli://192.168.80.100:12100/sysmaster:INFORMIXSERVER=gbasedb;USER=informix;PASSWORD=informix
3,启动脚本start_json_listener.sh
脚本放置于$INFORMIXDIR/bin 目录下,并加上可执行权限
#!/bin/sh

${INFORMIXDIR}/extend/krakatoa/jre/bin/java \
    -jar ${INFORMIXDIR}/bin/jsonListener.jar \
    -config ${INFORMIXDIR}/etc/jsonListener.properties \
    -logfile ${INFORMIXDIR}/tmp/jsonListener.log \
    -start &

sleep 2

exit 0
启动Json Listener
[informix@rhel6u8 etc]$ start_json_listener.sh
LOGBACK: No context given for ch.qos.logback.core.FileAppender[file]
starting mongo listener on port 12000
[informix@rhel6u8 etc]$ netstat -an | grep 12000
tcp        0      0 ::ffff:192.168.80.100:12000 :::*                   LISTEN
4,关闭脚本stop_json_listener.sh
脚本放置于$INFORMIXDIR/bin 目录下,并加上可执行权限
#!/bin/sh

${INFORMIXDIR}/extend/krakatoa/jre/bin/java \
    -jar ${INFORMIXDIR}/bin/jsonListener.jar \
    -config ${INFORMIXDIR}/etc/jsonListener.properties \
    -stop

exit 0
关闭Json Listener
[informix@rhel6u8 ~]$ stop_json_listener.sh
stop requested for localhost:12000
mongo shell
安装mongo软件,虽然我们仅仅需要使用到mongo shell(与dbaccess交换模式类似的工具),这里使用的mongodb的版本是2.4.9。将mongodb-linux-x86_64-2.4.9.tgz解压,并把bin目录下的所有文件移动的/usr/local/bin目录下。
[informix@rhel6u8 ~]$ mongo -version
MongoDB shell version: 2.4.9
确信json listener正在运行时,使用Mongo shell通过json listener连接到GBase 8t数据库,同时做一些操作,以验证连接及操作正确。
[informix@rhel6u8 ~]$ mongo localhost:12000
MongoDB shell version: 2.4.9
connecting to: localhost:12000/test
# 显示可用databases,不显示系统库
> show dbs
testdb  (empty)
# 进入使用testdb
> use testdb
switched to db testdb
# 显示现有collection,当前并没有创建过,显示空
> show collections
>
# 创建mycollection,并增加几条记录
>db.mycollection.insert({"_id":1 , "name":"GBbase 8a"})
>db.mycollection.insert({"_id":2 , "name":"GBbase 8t" , "desc":"Informix 12.10"})
>db.mycollection.insert({"_id":3 , "name":"GBbase 8m" , "type":"memory database"})
>
# 再次显示现有collection,当前有mycollection
> show collections
mycollection
# 显示mycollection中的信息
> db.mycollection.find()db.mycollection.find()
{ "_id" : 1, "name" : "GBbase 8a" }
{ "_id" : 2, "name" : "GBbase 8t", "desc" : "Informix 12.10" }
{ "_id" : 3, "name" : "GBbase 8m", "type" : "memory database" }
在数据库中,可以查看mycollection的表结构
[informix@rhel6u8 ~]$ dbschema -d testdb -t mycollection

DBSCHEMA Schema Utility       GBASE-SQL Version 12.10.FC4G1AEE

{ TABLE "informix".mycollection row size = 4240 number of columns = 4 index size = 146 }

create collection "testdb.mycollection" table "informix".mycollection
  (
    id char(128) not null ,
    data "informix".bson,
    modcount bigint,
    flags integer,
    primary key (id)
  );

revoke all on "informix".mycollection from "public" as "informix";

create unique index "informix".mycollection__id_ on "informix"
    .mycollection ("informix".bson_value_lvarchar(data,'_id') )
using btree collection '{ "ns" : { "name" : "testdb.mycollection.$_id_" } , "idx" : { "v" : 1 , "key" : { "_id" : [ 1 , "$string" ] } , "ns" : "testdb.mycollection" , "name" : "_id_" , "unique" : true , "index" : "mycollection__id_" } }';- 上一篇: Informix历史【转贴】
- 下一篇: GBase 8t使用unix_timestamp()函数
